Ariel Salaverria Custom Knives Ariel Salaverria Custom Knives - San Mai and Cable Damascus Custom Knives - Knifemaking Tutorials
    Home | About Me | Tutorials | Knifemaking | Ordering | Contact | Newsletter  
  Available | Knives | Jewelry | EDC Tools | Lanyard Beads | Watch Buckles and Straps | Rings | Crosses | Hearts  
#23 - #22 - #21 - #20 - #19 - #18 - #17 - #16 - #15 - #14 - #13 - #12 - #11 - #10 - #9 - #8 - #7 - #6 - #5 - #4 - #3 - #2 - #1
 
#27 - #26 - #25 - #24
 

Knifemaking - Cable Damascus with No Hammer Marks
This is the finished knife that I've made for David Darom's 3rd book, "100 Custom Knives in the Making"
The book was introduced to the public on Blade 2006, and shows a tutorial of mine on no hammer marks cable forging.

Order Details:
-10" blade (including bolsters), 7 1/2 cutting edge in cable damascus, no hammer marks.
-Handle in deer stag with a handmade decorated pin.
-Leather and brass spacers.
-Hand stitched and worked leather sheath.

Knife making process
This is the begining of it, a section of cable and a rod to insert inside. The rod will provide a secure tang for the handle. (Picture 1)

Secured on the vise, already hammered in (you can see some of the inner cable strand coming out on the other side of the rod) (Picture 2)

Done so far. (Picture 3)

Cutting the extra inner strand with a disk hand grinder. (Picture 4)

Placing the cable on the over for a double purpose: burn all the oil on it and heat it so I can twist it to make the cable more compact. Note that I tied the cable with 5 metal wires to the cable doesn't open with the heat. (Picture 5)

Cable on the oven getting heated. (Picture 6)

Getting it out of the over, red hot. (Picture 7)

Twisting one side on the vise. (Picture 8)

Knifemaking - Cable Damascus with No Hammer Marks   Knifemaking - Cable Damascus with No Hammer Marks   Knifemaking - Cable Damascus with No Hammer Marks   Knifemaking - Cable Damascus with No Hammer Marks   Knifemaking - Cable Damascus with No Hammer Marks   Knifemaking - Cable Damascus with No Hammer Marks   Knifemaking - Cable Damascus with No Hammer Marks   Knifemaking - Cable Damascus with No Hammer Marks
Picture 1   Picture 2   Picture 3   Picture 4   Picture 5   Picture 6   Picture 7   Picture 8

The other side. (Picture 9)

Removing the first metal ties to insert the cable on the pipe that will prevent it from getting hammer marks. (Picture 10)

Grabbing the pipe to start the next step. (Picture 11)

Hammering the pipe to get the cable inside it. (Picture 12)

Cable almost completely inside. Note the discoloration and flattening on one side... I had to heat it several times to get it to receive the cable inside. (Picture 13)

"Sealing" one end with an electric welder. We'll see later why the "sealing" shouldn't be perfect. (Pictures 14, 15 and 16)

Knifemaking - Cable Damascus with No Hammer Marks   Knifemaking - Cable Damascus with No Hammer Marks   Knifemaking - Cable Damascus with No Hammer Marks   Knifemaking - Cable Damascus with No Hammer Marks   Knifemaking - Cable Damascus with No Hammer Marks   Knifemaking - Cable Damascus with No Hammer Marks   Knifemaking - Cable Damascus with No Hammer Marks   Knifemaking - Cable Damascus with No Hammer Marks
Picture 9   Picture 10   Picture 11   Picture 12   Picture 13   Picture 14   Picture 15   Picture 16

One end done. (Picture 17)

Adding a washer to the other end. (Picture 18)

Presenting it for the welding. (Picture 19)

Welding it. (Pictures 20 and 21)

Welded. (Picture 22)

Container ready to go to the oven for the following hammering. (Picture 23)

Retrieving the pipe from the gas oven. (Pictures 24 and 25)

Knifemaking - Cable Damascus with No Hammer Marks   Knifemaking - Cable Damascus with No Hammer Marks   Knifemaking - Cable Damascus with No Hammer Marks   Knifemaking - Cable Damascus with No Hammer Marks   Knifemaking - Cable Damascus with No Hammer Marks   Knifemaking - Cable Damascus with No Hammer Marks   Knifemaking - Cable Damascus with No Hammer Marks   Knifemaking - Cable Damascus with No Hammer Marks
Picture 17   Picture 18   Picture 19   Picture 20   Picture 21   Picture 22   Picture 23   Picture 24

Here you can see how the Oxigen reduction works. As the container isn't 100% sealed, the Oxigen from the inside burns to the outside in form of a small flame. (Picture 26)

Starting to hammer the pipe with the cable inside. Since the cable doesn't get in contact with the direct flame, this process prevents the decarburization of the cable strands. (Pictures 27, 28 and 29)

More Oxigen getting out. (Picture 30)

A bit more flattened. (Picture 31)

It finally starts to look like something that might become a blade. (Picture 32)

Knifemaking - Cable Damascus with No Hammer Marks   Knifemaking - Cable Damascus with No Hammer Marks   Knifemaking - Cable Damascus with No Hammer Marks   Knifemaking - Cable Damascus with No Hammer Marks   Knifemaking - Cable Damascus with No Hammer Marks   Knifemaking - Cable Damascus with No Hammer Marks   Knifemaking - Cable Damascus with No Hammer Marks   Knifemaking - Cable Damascus with No Hammer Marks
Picture 25   Picture 26   Picture 27   Picture 28   Picture 29   Picture 30   Picture 31   Picture 32

Flattened at last! (Pictures 33, 34 and 35)

Now it's time to get the cable blade out of the pipe/can. First I grind off the part that covers the edge. (Pictures 36, 37 and 38)

Now I clamp it to a vise and start opening it with a chisel and a hammer. Since the pipe is stainless steel, it didn't weld agains the cable. (Pictures 39, 40 and 41)

Knifemaking - Cable Damascus with No Hammer Marks   Knifemaking - Cable Damascus with No Hammer Marks   Knifemaking - Cable Damascus with No Hammer Marks   Knifemaking - Cable Damascus with No Hammer Marks   Knifemaking - Cable Damascus with No Hammer Marks   Knifemaking - Cable Damascus with No Hammer Marks   Knifemaking - Cable Damascus with No Hammer Marks   Knifemaking - Cable Damascus with No Hammer Marks
Picture 33   Picture 34   Picture 35   Picture 36   Picture 37   Picture 38   Picture 39   Picture 40

Laterals already removed from the blade. (Picture 42)

Chiseling the pipe from the bolster area. Since I want this area to remain unaltered, I have to be extra careful as to not damage the cable strands. (Picture 43)
Blade ready to come out. Note the cable pattern marked into the pipe. (Picture 44)

Blade ready to go to the grinder. (Picture 45)

Marking the blade to cut the profile and get rid of the welded part. (Picture 46)

This is a close up of the pipe you saw on the background on the previous picture. It's a cable placed inside a copper pipe and then filled in with liquid epoxy resin. We'll see it's use later. (Picture 47)

Cutting the unwanted parts of the blade. (Pictures 48 and 49)

Knifemaking - Cable Damascus with No Hammer Marks   Knifemaking - Cable Damascus with No Hammer Marks   Knifemaking - Cable Damascus with No Hammer Marks   Knifemaking - Cable Damascus with No Hammer Marks   Knifemaking - Cable Damascus with No Hammer Marks   Knifemaking - Cable Damascus with No Hammer Marks   Knifemaking - Cable Damascus with No Hammer Marks   Knifemaking - Cable Damascus with No Hammer Marks
Picture 41   Picture 42   Picture 43   Picture 44   Picture 45   Picture 46   Picture 47   Picture 48

Blade ready to be ground. (Picture 50)

Grinding the edge to make sure it welded well. (Pictures 51, 52 and 53)

Edge perfectly welded (that black line is just residue from the grinding weel) (Picture 54)

Masking the blade to make sure the bevels start on the exact same place on both sides. (Picture 55)

Starting the first grinding pass on one side. (Pictures 56 and 57)

Knifemaking - Cable Damascus with No Hammer Marks   Knifemaking - Cable Damascus with No Hammer Marks   Knifemaking - Cable Damascus with No Hammer Marks   Knifemaking - Cable Damascus with No Hammer Marks   Knifemaking - Cable Damascus with No Hammer Marks   Knifemaking - Cable Damascus with No Hammer Marks   Knifemaking - Cable Damascus with No Hammer Marks   Knifemaking - Cable Damascus with No Hammer Marks
Picture 49   Picture 50   Picture 51   Picture 52   Picture 53   Picture 54   Picture 55   Picture 56

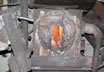
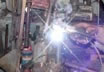
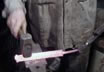
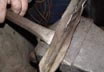
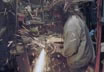
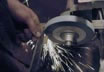
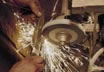
Othe side. (Pictures 58 and 59)

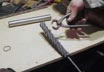
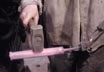
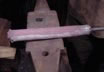
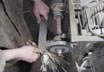
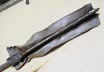
First pass finished on both sides now. (Picture 60)

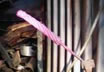
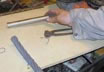
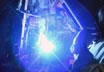
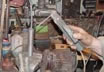
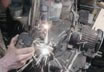
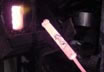
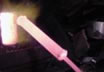
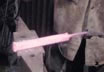
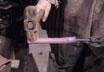
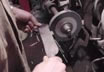
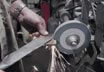
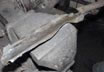
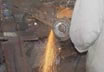
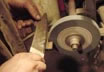
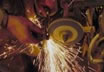
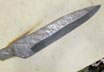
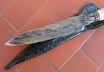
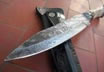
Other pass, but it's still not done yet (edge is thick yet) Note the oxide developed by heating the blade with the grinder and cooling it in water several times. (Picture 61)

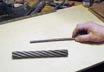
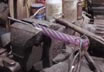
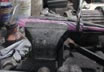
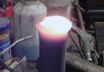
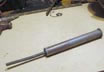
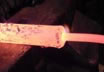
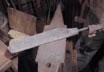
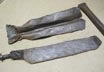
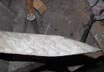
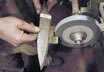
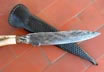
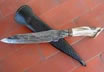
Finished blade, still oxidized. (Picture 62)

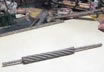
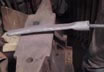
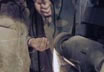
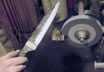
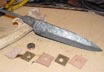
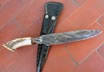
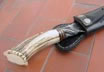
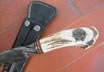
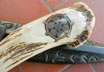
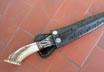
Finished blade with the handle components: deer stag, a slice of the cable/epoxy filled copper pipe, and some brass and leather spacer. (Picture 63)

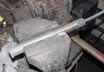
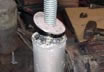
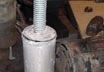
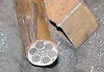
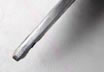
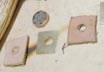
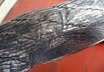
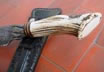
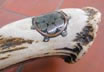
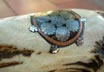
Close up of the cable/epoxy filled copper pipe, and the spacers. (Picture 64)

Knifemaking - Cable Damascus with No Hammer Marks   Knifemaking - Cable Damascus with No Hammer Marks   Knifemaking - Cable Damascus with No Hammer Marks   Knifemaking - Cable Damascus with No Hammer Marks   Knifemaking - Cable Damascus with No Hammer Marks   Knifemaking - Cable Damascus with No Hammer Marks   Knifemaking - Cable Damascus with No Hammer Marks   Knifemaking - Cable Damascus with No Hammer Marks
Picture 57   Picture 58   Picture 59   Picture 60   Picture 61   Picture 62   Picture 63   Picture 64
Finished Knife
No Hammer Marks Cable Damascus   No Hammer Marks Cable Damascus   No Hammer Marks Cable Damascus   No Hammer Marks Cable Damascus   No Hammer Marks Cable Damascus   No Hammer Marks Cable Damascus   No Hammer Marks Cable Damascus   No Hammer Marks Cable Damascus
#23 - #22 - #21 - #20 - #19 - #18 - #17 - #16 - #15 - #14 - #13 - #12 - #11 - #10 - #9 - #8 - #7 - #6 - #5 - #4 - #3 - #2 - #1
 
#27 - #26 - #25 - #24
 
  Available | Knives | Jewelry | EDC Tools | Lanyard Beads | Watch Buckles and Straps | Rings | Crosses | Hearts  
    Home | About Me | Tutorials | Knifemaking | Ordering | Contact | Newsletter  
Subscribe to the Ariel Salaverria Custom Knives Newsletter AES Custom Knives - Copyright 2004-2022 - Website by NsB