Ariel Salaverria Custom Knives Ariel Salaverria Custom Knives - San Mai and Cable Damascus Custom Knives - Knifemaking Tutorials
    Home | About Me | Tutorials | Knifemaking | Ordering | Contact | Newsletter  
  Available | Knives | Jewelry | EDC Tools | Lanyard Beads | Watch Buckles and Straps | Rings | Crosses | Hearts  
#23 - #22 - #21 - #20 - #19 - #18 - #17 - #16 - #15 - #14 - #13 - #12 - #11 - #10 - #9 - #8 - #7 - #6 - #5 - #4 - #3 - #2 - #1
 
#27 - #26 - #25 - #24
 

Knifemaking - Nessmuk Style Knife
A Nessmuk (George Sears Washington) style knife in cable damascus.

Order Details:
- 3.75” blade according to the blade profile the customer sent me.
- Blued cable damascus, with a 2-3mm thickness and a convex grind.
- 4" handle, including bolsters in virgin red deer stag in “S” shape.
- Bolsters in polished leather and copper enameled in red.
- Buttcap in polished leather and cable damascus.
- 2 sheaths, one following the lines of the knife and the other in a pankake style for secure carrying in the woods. Both in brown handstitched cow leather.

Knife making process
Cable forged and ground to shape. (Pictures 1, 2 and 3)

Mirror polished (to show the welding was perfect) ground to a convex edge. (Pictures 4 and 5)

Here's the piece of stag I got to complement the blade profile into the general "S" shape of the knife. (Picture 6)

Etched blade showing the the length of the tang. (Picture 7)
Also a test on the red and black glass on the copper. I make some efect on the red glass with black dots to match the "rough" finish of the cable.
To make the copper rings for the bolsters from a copper barstock I put it on the oven til it gets semiplastic (about 700 C) and then I stab it with a pointy instrument to make the hole. After that, I take it to shape with a file.

Presentation of the bolsters, blade and handle before gluing them together. (Pictures 8, 9 and 10)
Knifemaking Nessmuk Style Knife   Knifemaking Nessmuk Style Knife   Knifemaking Nessmuk Style Knife   Knifemaking Nessmuk Style Knife   Knifemaking Nessmuk Style Knife   Knifemaking Nessmuk Style Knife   Knifemaking Nessmuk Style Knife   Knifemaking Nessmuk Style Knife
Picture 1   Picture 2   Picture 3   Picture 4   Picture 5   Picture 6   Picture 7   Picture 8
I replaced the last leather ring so the bolster wouldn't look like it was so much bigger at the handle side than at the stag side. (it was just a couple of mm, but still)

It overtops the stag as it's still not glued and polished and I left a bit more of material to be able to finish it properly. (Pictures 11 and 12)

Same presentation, now with the blade blued. (Pictures 13 and 14)

Glued knife without the butt cap. (Picture 15)

Cable damascus buttcap welded into a screwed pin for safer attachment to the handle. (Picture 16)
Knifemaking Nessmuk Style Knife   Knifemaking Nessmuk Style Knife   Knifemaking Nessmuk Style Knife   Knifemaking Nessmuk Style Knife   Knifemaking Nessmuk Style Knife   Knifemaking Nessmuk Style Knife   Knifemaking Nessmuk Style Knife   Knifemaking Nessmuk Style Knife
Picture 9   Picture 10   Picture 11   Picture 12   Picture 13   Picture 14   Picture 15   Picture 16

Sheath Making
Leather pieces for the front and back of the sheath cutted following the lines of the knife. (Picture 17)

After marking the shape of the blade, I cutted two leather ribs to protect the stitches later. (Picture 18)

Gluing them with contact cement. (Picture 19)

Glued ribs. (Picture 20)

Glued front part of the pouch. (Picture 21)

Marking the places for the holes. (Picture 22)

Drilling the leather hole by hole for the stitches. (Picture 23)

Drilled sheath. (Picture 24)

Knifemaking Nessmuk Style Knife   Knifemaking Nessmuk Style Knife   Knifemaking Nessmuk Style Knife   Knifemaking Nessmuk Style Knife   Knifemaking Nessmuk Style Knife   Knifemaking Nessmuk Style Knife   Knifemaking Nessmuk Style Knife   Knifemaking Nessmuk Style Knife
Picture 17   Picture 18   Picture 19   Picture 20   Picture 21   Picture 22   Picture 23   Picture 24

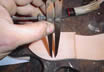
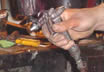
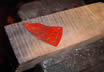
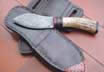
Dying the sheath with an aerograph. (Picture 25)

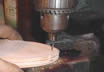
Already drilled detail in copper for the point of the sheath. (Picture 26)

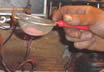
Spraying destiled water on it so it can retain the powdered enamel later. (Picture 27)

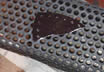
Powdering the enamel on it, sifting it through a regular coffee strainer. (Picture 28)

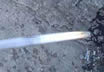
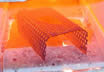
Piece inside the oven to get cooked. (Picture 29)
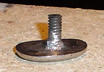
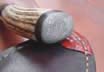
I use that inverted U shape piece to insert and retrieve the piece from the oven easily, with just a steel bar.

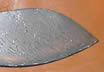
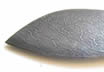
When you took it off the oven, the hot glass looks almost black, it gets the real color when it cools off. (Picture 30)

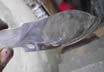
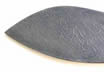
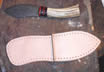
Cooled off and finished piece. (Picture 31)

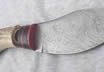
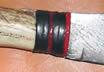
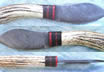
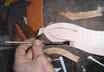
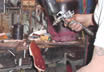
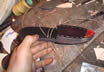
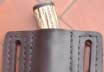
Hand stitching the sheath. (Picture 32)

Knifemaking Nessmuk Style Knife   Knifemaking Nessmuk Style Knife   Knifemaking Nessmuk Style Knife   Knifemaking Nessmuk Style Knife   Knifemaking Nessmuk Style Knife   Knifemaking Nessmuk Style Knife   Knifemaking Nessmuk Style Knife   Knifemaking Nessmuk Style Knife
Picture 25   Picture 26   Picture 27   Picture 28   Picture 29   Picture 30   Picture 31   Picture 32

Finished sheath. (Pictures 33 and 34)

Knifemaking Nessmuk Style Knife   Knifemaking Nessmuk Style Knife   blank image   blank image   blank image   blank image   blank image   blank image
Picture 33   Picture 34                        
Finished Knife and Sheaths
Nessmuk Style Knife   Nessmuk Style Knife   Nessmuk Style Knife   Nessmuk Style Knife   Nessmuk Style Knife   Nessmuk Style Knife   blank image   blank image
#23 - #22 - #21 - #20 - #19 - #18 - #17 - #16 - #15 - #14 - #13 - #12 - #11 - #10 - #9 - #8 - #7 - #6 - #5 - #4 - #3 - #2 - #1
 
#27 - #26 - #25 - #24
 
  Available | Knives | Jewelry | EDC Tools | Lanyard Beads | Watch Buckles and Straps | Rings | Crosses | Hearts  
    Home | About Me | Tutorials | Knifemaking | Ordering | Contact | Newsletter  
Subscribe to the Ariel Salaverria Custom Knives Newsletter AES Custom Knives - Copyright 2004-2022 - Website by NsB