|
Tutorials - Polyester Resin
Impregnation
A very efficient low tech way to impregnate wood and other porous
materials. |
 |
There are many beautiful woods that are too soft and
porous to be used on knife handles.
If you still use them, when you finish the piece and polish the handles
with rotative polishing cloth and polishing paste, you fill all the
porous with the paste, leaving a dirty and matte look.
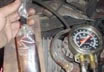
With this method, it's fairly easy to get a nice finish and a decent
hardness. For this I use a Vacuum pump (the compressor of a regular
home refrigerator, connected on the proper end) with a vacuometer
connected to it - it marks 22.5 inches.
The idea is to impregnate all the empty spaces of the wood with the
polyester resin.
This is not epoxy resin. It's polyester resin
diluted to be liquified enough (10% styrene monomer), as it's more
liquid than the epoxy one. Epoxy doesn't get liquified enough (at
least with the epoxy resins I have access locally)
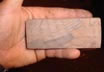
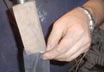
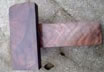
Piece of nut tree root. (Picture 1)
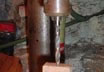
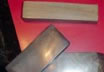
Making a hole on it like I was going to use it for a hidden tang blade.
(Picture 2)
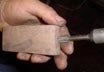
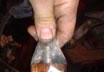
Threading it. (Picture 3)
I screw a threaded accesorie to allow me to fix a piece of hose. This
hose ought to be transparent/translucent so we can check when the
resin starts to get into it and cut the process before it reachs the
pump. (Picture 4)
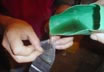
Placing 50 grams of polyester resin (is important that it's as liquified
as posible) on a plastic bag similar in size to the piece of wood
to later place the wood inside it. (Pictures 5 and 6)
Once the wood is placed inside the bag with the resin, I seal it with
pvc tape and start the vacuum pump. (Pictures 7 and 8) |
|
| Picture 1 |
|
Picture 2 |
|
Picture 3 |
|
Picture 4 |
|
Picture 5 |
|
Picture 6 |
|
Picture 7 |
|
Picture 8 |
When the resin starts to harden, I turn the pump off.
(Picture 9)
For this size of wood (4x3x15 cm.) it took me about 6 minutes. The
entire piece gets impregnated (providing you drilled a hole deep enough
- 3/4 or 7/8 of the piece to be impregnated)
This is for a room temperature of about 20C, but it also depends on
the manufacturer, how old the resin is, the drying time, the ammount
of styrene monomer that it has, the % of dye (if any), etc.
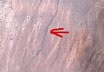
Here you can see an inner crack on the root, completely sealed with
the resin. (Picture 10)
After the resin dryes up, I sand them to 400 grit and polish them
with a rotative polishing disk with polishing paste. |
| Impregnated and Polished
Wood |
|