|
Tutorials - Polyester Resin
Impregnation II
Another step in an already very efficient way to
impregnate wood. This time for not so soft materials. |
 |
I've already made a tutorial on A
very efficient low tech way to impregnate wood and other porous materials,
this one is based on that one, but with an extra step, to make sure
woods and other harder (but not hard enough to use them in natural)
materials can be easily impregnated too.
For the particle board piece I've used for the pictures the previous
method would have been more than enough, but I also wanted to show
that when you put certain techniques in the equation, you can use
materials that otherwise are absolutely no good for knifemaking (Can
you imagine a particle board handle for instance? How long would that
last and feel?)
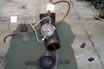
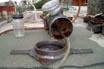
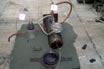
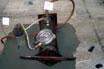
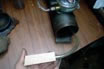
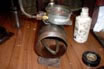
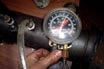
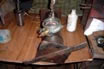
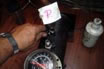
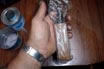
This is the vacuum chamber I've made for this process. It's a 4"
diameter iron tube with the back end closed with a welded flat and
the front end threaded to accept the cap you see there. (Pictures
1, 2, 3 and 4)
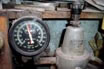
It has two different connections, the "V" marked one is
the one connected to the vacuum pump. The glass in the middle acts
as "trap" in case resin gets sucked in. This way, if you
use too much, it gets trapped in the glass instead of messing up the
compressor. The connected vacuum gauge will measure the pressure in
the vacuum chamber when the compressor is running.
Connection marked with a "P" is for the compressed air I'll
use later.
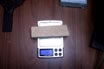
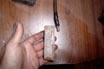
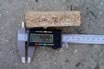
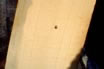
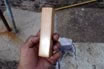
Here's a particle board piece that has already been drilled (5/16"
diameter, 3" deep) and threaded to accept the vacuum tube. It
weights 1.62 ounces. (Picture 5)
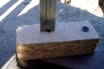
Connected to the vacuum tube via the threaded tip. (Picture 6)
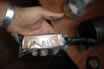
I then put the block of wood inside a plastic bag with 50 grams or
poliester resin. (Picture 7)
This resin I use is more liquid than the one I used to use for making
micarta in the past (nowadays I use this exclusively). It comes this
way from the factory directly, with the maximum added styrene monomer
already there. It's more expensive than the other, but in this quantities
it's crystal clear, and doesn't leave a blueish tone that would run
the natural color of the wood or stag. I only have to add 1% of catalyst
as hardener agent.
Note the difference as soon as I start the vacuum compressor. (Picture
8) |
|
| Picture 1 |
|
Picture 2 |
|
Picture 3 |
|
Picture 4 |
|
Picture 5 |
|
Picture 6 |
|
Picture 7 |
|
Picture 8 |
|
Once I have that set up, I place it inside the chamber
and close it using the threaded cap. The vacuum gauge now meassures
18 linear inches. (Pictures 9 and 10)
After about 1-2 minutes, I close the vacuum connection, remove the
tube for easy manipulation of the rest of the stuff. (Picture
11)
Now this is the second step that makes a difference. When I open the
intake for compressed air and apply 5 ATMs (70 lbs per square inch)
for about 4-5 minutes, this forces an even deeper resin penetration
before it gets gellyfied (about 6 minutes for the resin I use) (Pictures
12 and 13)
Once the resin gets like this, I stop the compressor and open the
cap to retrieve the piece. (Picture 12)
Depending on the composition of the resin, you have another 4-10 minutes
for it to dry up. In that time you can just retrieve the vacuum insert
with no problems. I don't use a release agent because of this. At
this 10-15 minutes, the resin it's somewhat hard, and if you forget
to retrieve the vacuum insert and leave it there, it happened to me
the past, there's no way you are getting it out, period
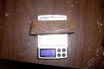
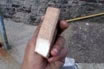
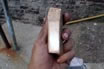
Particle wood out of the bag, already impregnated. (Picture 15)
Difference between the original weight and the after-impregnation
weight: 1.13 oz (Picture 16) |
|
| Picture 9 |
|
Picture 10 |
|
Picture 11 |
|
Picture 12 |
|
Picture 13 |
|
Picture 14 |
|
Picture 15 |
|
Picture 16 |
|
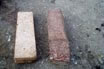
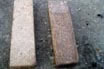
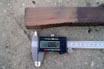
Comparo between a regular piece of particle board (left)
and a impregnated and polished one (right) (Pictures 17 and 18)
It's best to wait 24 hours before polishing the impregnated piece,
as it wouldn't look as good if done before, and would somewhat mess
up the polishing cloth as it's not 100% dried up.
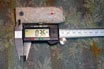
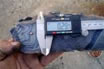
To show the hardness of the impregnated wood in a non conventional,
yet graphic way, I've decided to shoot at them with a CO2 Gamo V3
(425fps) pistol shooting round .177" copper pellets at a distance
of 3 meters (10 ft)
Depth of the mark made in the impregnated particle board: 0.0141"
(Picture 19)
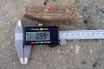
Depth of the mark made in a regular particle board: 0.0633" (Picture
20)
Depth of the mark made in the impregnated particle board (on a lateral):
0.0389" (Picture 21)
Depth of the hole made in a regular particle board (on a lateral):
0.1925" (Picture 22)
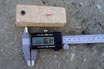
Depth of the mark made in a regular piece of Guayacan (a hard wood):
0.0338" (Picture 23)
Depth of the hole made in my own made micarta: 0.0114" (Picture
24) |
|
| Picture 17 |
|
Picture 18 |
|
Picture 19 |
|
Picture 20 |
|
Picture 21 |
|
Picture 22 |
|
Picture 23 |
|
Picture 24 |
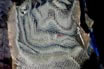
Close up of the mark in the micarta. (Picture 25)
Pellet incrustated on white spruce wood, a soft wood, at the same
distance. (Picture 26)
How all the marks/holes were measured. (Picture 27) |
| Picture 25 |
|
Picture 26 |
|
Picture 27 |
|
|
|
|
|
|
|
|
|
|
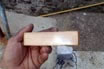
Impregnated and Polished
Wood
Dried up and polished particle board. A grainy, super soft wood. (Pictures
1 and 2)
Dried up and polished Haya good. A semi soft wood. (Pictures 3
and 4) |
| Picture 1 |
|
Picture 2 |
|
Picture 3 |
|
Picture 4 |
|
|
|
|
|
|
|
|
|